TestRail integrates with Azure DevOps so your team can link, view, add, and push issues between TestRail and Azure DevOps as bugs/defects, requirements/references, or both.
The TestRail integration with Azure DevOps supports all four methods of integrating TestRail with the issue, defect, and requirements trackers:
-
- Using defect URLs to link test results to Azure DevOps
- Using the defect plugin for Azure DevOps to push and hover over Azure DevOps Issues
- Using reference URLs to link test cases to Azure DevOps Issues
- Using the reference plugin for Azure DevOps to look up Azure DevOps issues in the References field of TestRail entities such as test cases, test runs, and milestones
You don’t have to use all the listed integration options; you can mix and match the integration with other tools. Configuring the integration usually only takes a few minutes. This guide explains how to configure the integration and how it works.
You can find more information about TestRail’s bug, issue, and defect integrations here, or read more about TestRail’s integrations with requirements and references management systems here.
Configuring defects
Defect URLs
The defect URLs are used to let TestRail know how to convert a Defect ID into a URL for your Azure DevOps instance. There are two types of URLs: View URLs and Add URLs.
The Defect View URL is used to build a link to Azure DevOps based on the Defect ID, so you can simply click on an ID to open the issue directly in Azure DevOps.
When you set up the Defect View URLs integration with Azure DevOps Issues, you can paste the ID of an Azure DevOps issue in the Defects field of a test result and TestRail will automatically convert that ID into a clickable link to view the issue in Azure DevOps. This allows your team to link tests with Azure DevOps issues and create defect and traceability reports in TestRail.
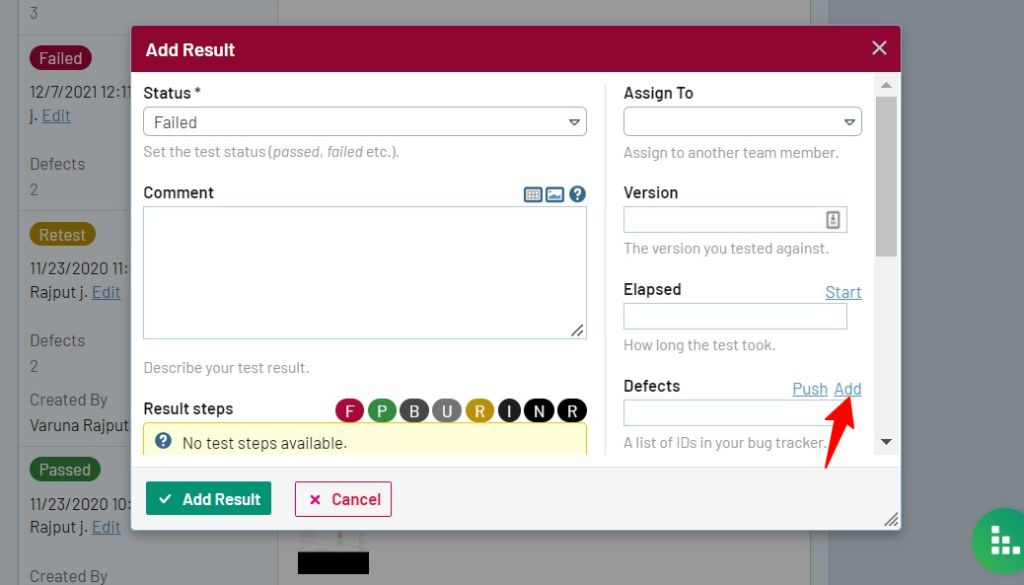
The Defect Add URL is used to create a link to the issue creation screen inside Azure DevOps. Once the URL is configured, a new Add link appears next to the Defects field in the Add Test Result dialog and the ‘Defects’ menu in TestRail’s Defect From Anywhere feature. This link allows you to jump to Azure DevOps’s New Issue form to report a new bug.
Add Defect link in the ‘Add Result’ dialog
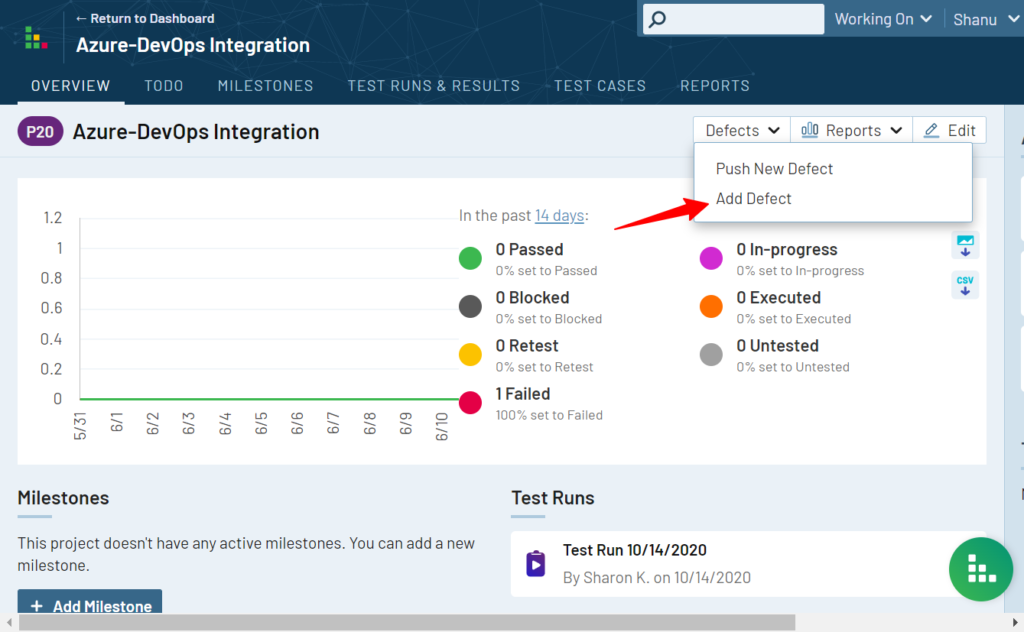
Add Defect link in Defect From Anywhere menu
If you see the ‘Add’ link, you can copy the ID of your new Azure DevOps issue and enter it into any Defects or References field inside TestRail.
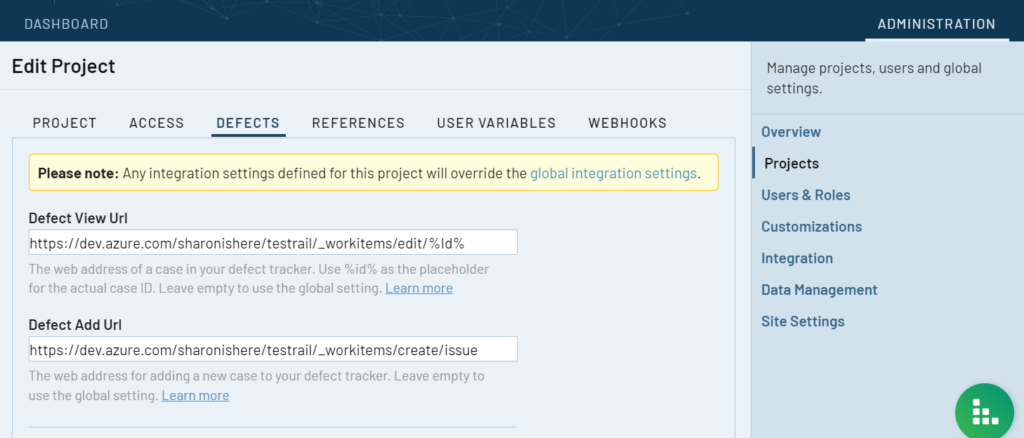
To configure Azure DevOps Defect URLs in TestRail, select Administration > Integration. You can alternatively enter separate bug tracker URLs for each project under Administration > Projects. Use the following example URLs to configure the addresses:
Azure DevOps installation
Defect View Url: https://<Azure_DevOps_URL>/<Project>/_workitems/edit/%id%/
Defect Add Url:  https://<Azure_DevOps_URL>/<Project>/_workitems/create/issue
Please make sure to replace <Azure_DevOps_URL> and <Project> with the actual URL of the instance and the Project name in Azure DevOps you want to integrate with. Additionally, if the Bug item type is not enabled for your project, you should replace ‘Bug’ with ‘Issue’ or another item type.
Example:
Here, the Azure DevOps instance is sharonishere and the project is testrail
Defect View URL: https://dev.azure.com/sharonishere/testrail/_workitems/edit/%Id%
Defect Add URL: https://dev.azure.com/sharonishere/testrail/_workitems/create/issue
Here’s how the Defect URLs look in TestRail:
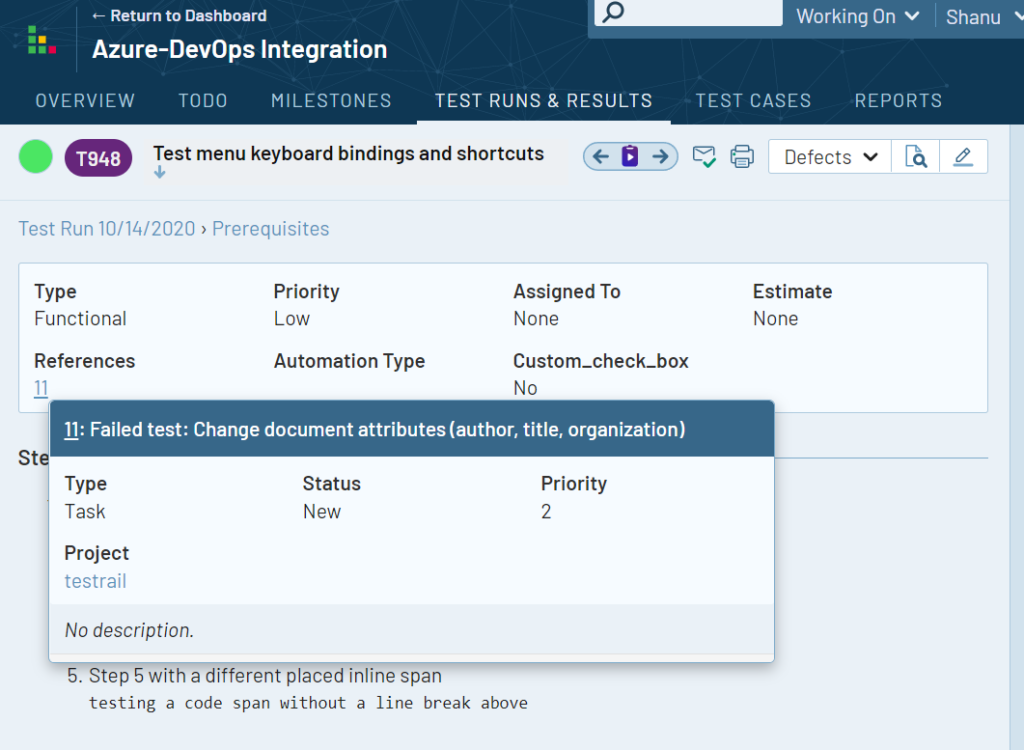
Additionally, if you have the defect plugin configured, you’ll also be able to hover over the defect ID to view the issue details directly from within TestRail.
Defect Plugin
Defect plugins can be used to implement a deeper bug tracker integration and TestRail comes with a ready-to-use Azure DevOps defect plugin.
The TestRail defect plugin for Azure DevOps allows you to push new issues to Azure DevOps without leaving TestRail and automatically link them as defects. You can also hover over linked defects to view Azure DevOps Issues fields like Title, Assignees, Labels, Projects, Milestone, and Linked pull requests.
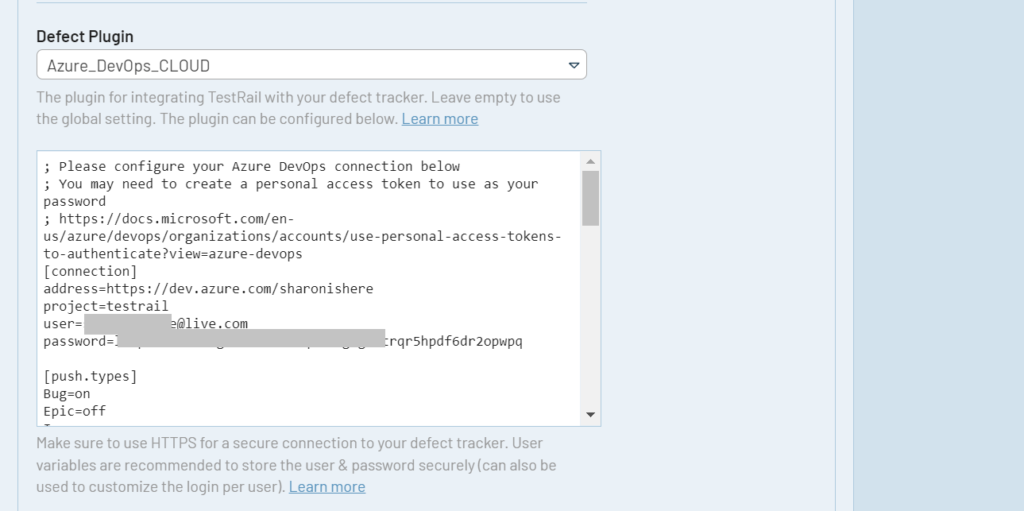
To configure the defect plugin, select Administration > Integration and select Azure DevOps in the Defect Plugin drop-down list. The next step is to configure all the necessary connection settings in the [connection] category. You can also configure the integration for a specific project by editing a project’s settings.
The Defect Plugin utilizes Azure DevOps API, so valid credentials are needed to connect to the API. You can enter a single set of credentials here for all Azure DevOps users or you can insert User Variables to allow each TestRail user to configure their own credentials. These credentials may be a combination of an email address or username with a password or API key.
We strongly recommend configuring User Variables. You can learn more about configuring these in our documentation here.
How to configure the Azure DevOps plugin
Step 1: Select Administration > Integration
Step 2: Select Azure DevOps in the Defect Plugin drop-down list.
Step 3: Configure all the necessary connection settings in the following categorie
[connection]
user=username  (Whatever the username you are signed in as within Azure DevOps)
password=ghp_ZE7tHmVtoken
Note: To generate an Azure DevOps API token in your account, click on User settings, then click on Personal access tokens in the left menu and select + New Token.
Please make sure that all required permissions are enabled while generating the token by clicking and selecting one of the options below:
-
- Full Access
- Custom Defined
[push.fields] and [hover.fields] are preconfigured. To do any customizations, refer to the Defect Plugin Customizations section.
A plugin is available for both Azure DevOps Cloud, and Azure DevOps Server. These plugins have the same functionality with the exception of 1 field. The Azure DevOps Server plugin does not support the assignee field, due to API limitations.
Once the connection settings are saved and the defect plugin configured, you should be able to ‘Push’ and ‘hover’ over the Azure DevOps issue ID within TestRail now.
The option to push a new defect will appear in the Defect from Anywhere menu, as well as in the Add Result dialog within a test run. This dialog allows you to create a new issue in Azure DevOps without leaving TestRail.
Push Defect in ‘Defect from Anywhere’ menu
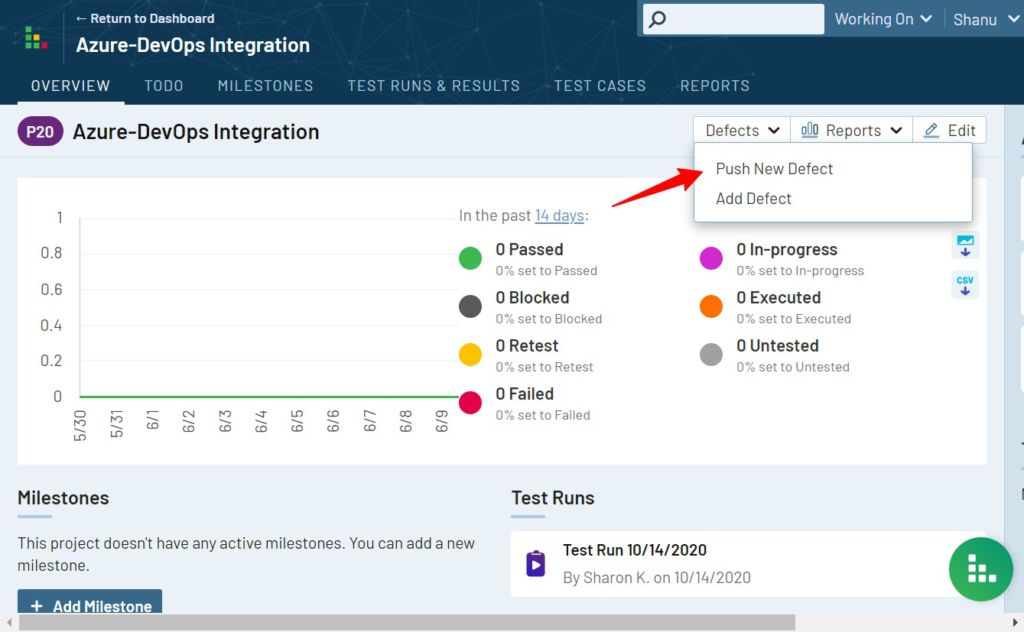
Push Defect link in ‘Add Result’ dialog

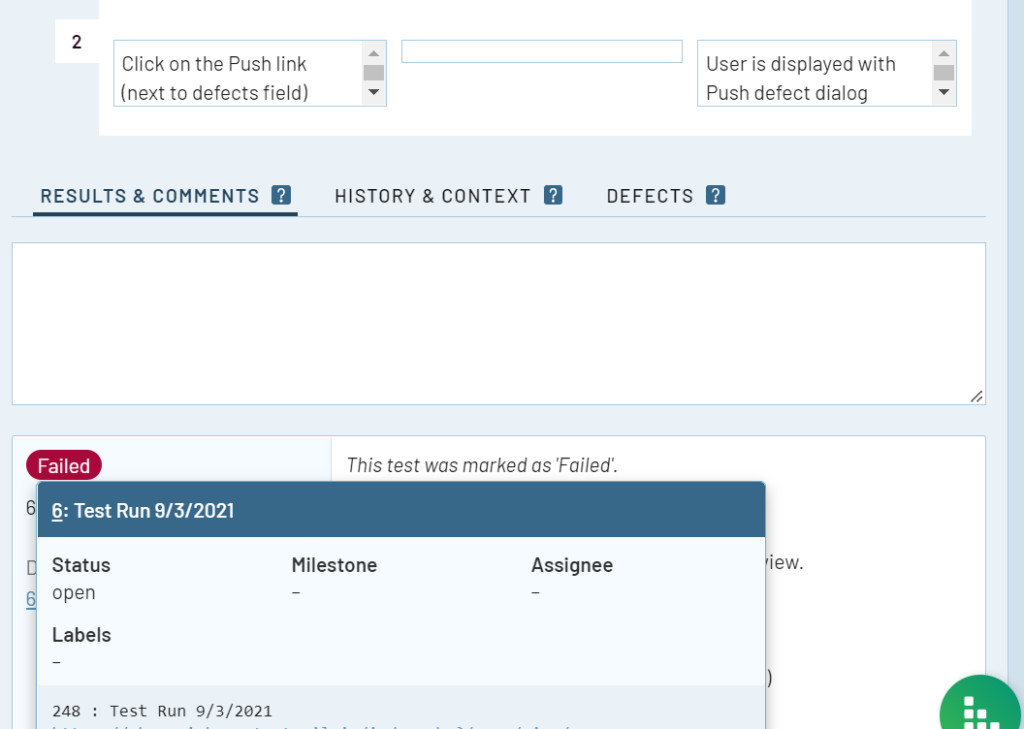
TestRail shows the defect description when hovered over the defect/issue ID
Defect Plugin Customizations
The Azure DevOps defect plugin was built to work with a standard Azure DevOps configuration. TestRail allows you to customize the fields which appear in the Push dialog as well as when hovering over Defect IDs. Preconfigured push fields and hover fields can be set to ‘on’ or ‘off’ by typing the text (on/off) in their respective [push.fields] and [hover.fields] sections, or changing the order in which they appear by the fields in each section.
Note: Some fields (such as the title field) are always enabled and may not appear in these sections due to always being required by either TestRail or Azure DevOps.
The Azure DevOps Defect Plugin also supports modifying field properties as well as custom fields.
[push.types]
Bug=on
Epic=off
Issue=on
Task=on
UserStory=off
By default, the plugin supports the item types defined above, with only Bug, Issue, and Task being enabled initially. Within Azure DevOps, different item types have different description-type fields. For example, a Bug in Azure DevOps has Reproduction Steps and System Info Fields, while an Issue item type uses a Description field. These three field types can be enabled and disabled on a per-item type basis using the [type.settings.<item_type>] section:
[type.settings.Bug]
description=off
repro_steps=default
system_info=on
The default value is used to specify where the configured TestRail bug description will be populated.
In addition to enabling, disabling, or re-organizing fields as described above, it’s also possible to change additional options per field. To do this, you would define a section for the field, such as [push.field.description] and specify additional options within this section.
[push.field.description]
label=Detailed Description
required=true
Please see below for full list and explanation of the available field options:
| Option | Description |
|---|---|
| api_field | The key for the field in an API response. Examples are ‘api_field=System.Description’ and ‘api_field=Microsoft.VSTS.Common.AcceptanceCriteria’. (Required for custom fields) |
| api_list_id | The ID value of a list field, such as ‘661eb38e-6f0b-484a-bc53-27a57c2e2d50’. The value is obtained from the Azure DevOps API. (Required for custom fields which have ‘type=dropdown’) |
| label | Specifies the display name of the field in the Push Defect dialogue (Required for custom fields) |
| size | Specifies whether the field is displayed as a compact field (compact) or uses the full width of the dialogue (full) |
| remember | Specifies if previously selected values for this field should be remembered and restored the next time the Push Defect dialogue is opened |
| required | Specifies if this field is mandatory or optional and whether users are required to enter a value for this field in the Push Defect dialogue |
| type | Specifies the type of this field, please see section Custom fields below for a list of supported field types. (Required for custom fields. If ‘type=dropdown’ for a custom field, then ‘api_list_id’ is also required.) |
Custom fields
You can also use the above-mentioned approach to add custom fields to TestRail’s Push Defect dialogue. To do this, simply add a line with your custom field to the [push.fields] section to add a field:
[push.fields]
# ...
description=on
customfield_customer=on
Then, add a [field.settings.customfield_<field_name>] section. This section is required so the plugin can push and/or retrieve data from your tool. <field_name> can be any value, as the field’s properties will be defined inside the corresponding section. The following is an example:
[field.settings.customfield_customer]
api_field=System.Customer
label=Customer
size=compact
type=dropdown
required=true
The following field types are supported:
| Field Type | Description |
|---|---|
| bool | A Yes/No dropdown menu for True/False, Yes/No, or similar binary values |
| date | A string field which accepts a YYYY-MM-DD or similarly structured date value. Formatting may depend on the integrated tool’s requirements. |
| datetime | A string field which accepts a YYYY-MM-DD HH:MM or similarly structured date and time value. Formatting may depend on the integrated tool’s requirements. |
| dropdown | A dropdown list that allows users to select one of the multiple options |
| string | A small free-text field fr up to 250 characters. |
| text | A large free-text field without practical size limitations. |
Attachments
The Azure DevOps Defect Plugin supports submitting attachments to Azure DevOps as well. This field can be turned on and off, but cannot be customized. To submit one or more attachments to Azure DevOps, simply drag the attachment to the attachments or description areas of the push dialog or click on the area to choose an attachment from your file system.
Configuring References
Reference URLs
The reference URLs are implemented in a very similar manner to Defect URLs described above. The primary difference is Reference URLs are used for the ‘References’ field on various TestRail entities (instead of the Defects field).
The Reference View URL is configured in the same manner as described above and allows TestRail to create a direct link to Azure DevOps based on an ID entered into a References field.
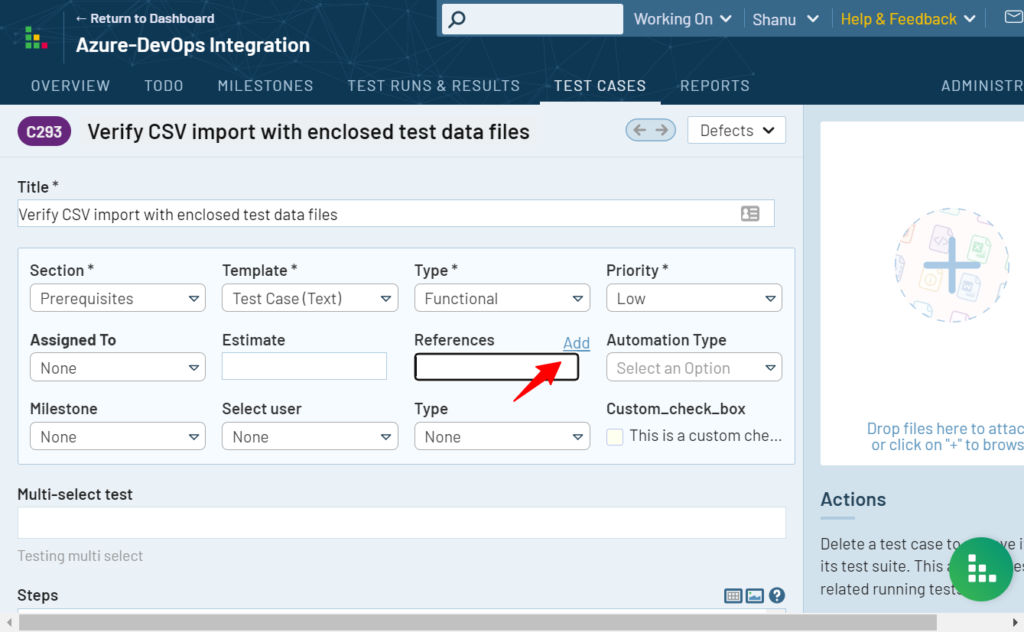
The Reference Add URL is also configured in the same way as the Defect Add URL. Once configured, an ‘Add’ link will appear next to each References field in your instance or project. If you use the ‘Add’ link, you can copy the ID of your new Azure DevOps issue and enter it into any Defects or References field inside TestRail.
Add References link in Testcase
To configure Azure DevOps Reference URLs in TestRail, select Administration > Integration. You can alternatively enter separate bug tracker URLs for each project under Administration > Projects. Use the following example URLs to configure the addresses:
Azure DevOps installation
Reference View Url: https://<Azure_DevOps_URL>/<Project>/_workitems/edit/%id%/
Reference Add Url:  https://<Azure_DevOps_URL>/<Project>/_workitems/create/issue
Please make sure to replace <Azure_DevOps_URL> and <Project> with the actual URL of the instance and the Project name in Azure DevOps you want to integrate with. Additionally, if the Bug item type is not enabled for your project, you should replace ‘Bug’ with ‘Issue’ or another item type.
Example:
Here, the Azure DevOps instance is sharonishere and the project is testrail
Reference View URL: https://dev.azure.com/sharonishere/testrail/_workitems/edit/%Id%
Reference Add URL: https://dev.azure.com/sharonishere/testrail/_workitems/create/issue
Here’s how the Reference URLs look in TestRail:

If you have the Reference plugin configured, you’ll also be able to hover over a Reference ID to view the issue details directly from within TestRail. Keep reading to learn how to use and configure the Reference Plugin.
Reference Plugin
Reference plugins can be used to retrieve additional information from IDs entered into the References field of TestRail entities, such as test cases, test runs, and milestones. The Reference Plugin is configured on the References tab of the integration settings, in the same manner, the Defect Plugin is configured.
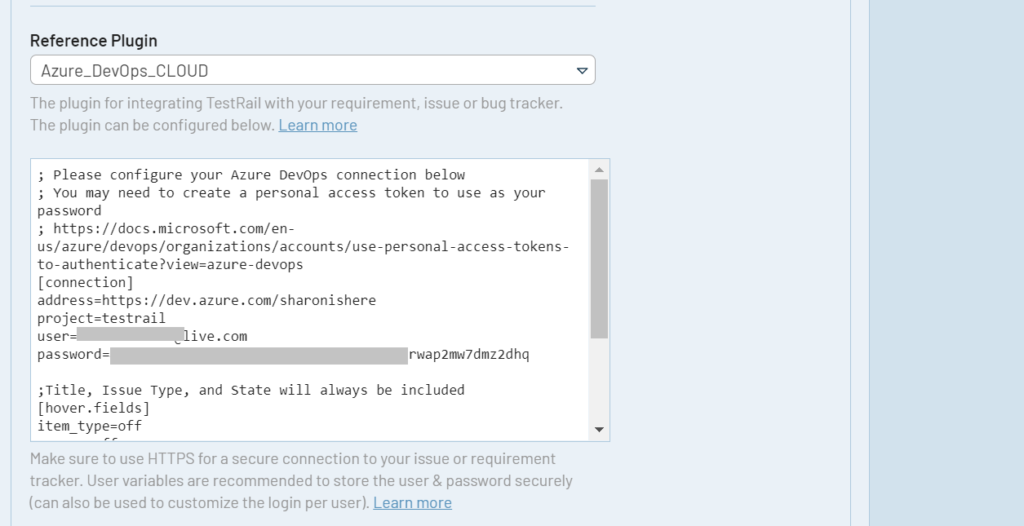
To configure the reference plugin, select Administration > Integration and select Azure DevOps in the Reference Plugin drop-down list. The next step is configuring all the necessary connection settings in the [connection] category. You can also configure the integration for a specific project by editing a project’s settings.
Note: If you have the Defect Plugin already configured for Azure DevOps, you can simply copy your [connection] and [hover.fields] sections from the Defect Plugin into the Reference plugin configuration. Alternatively, you can choose different fields to be displayed for References and Defects.
Note: The reference plugin supports hovering over Reference IDs but does not support a Push dialog for the References field.
It is also possible to customize the fields which appear via link hovering and add custom fields, as described in the Defect Plugin Customizations section.
Once the connection settings are saved, you should be able to ‘hover’ over the Azure DevOps issue ID within TestRail now.
For more information, please read our documentation about Reference plugins.
Additional Customizations
TestRail also supports custom defect plugins. If your team uses TestRail Server, it is possible to further customize the defect plugin (or build your own) to support additional field types or other data. For additional information, please see our documentation about Custom plugins.