レポート:カスタム レポート プラグインの作成 (1)
レポート:はじめにで述べたように 、レポートは PHP で開発されているため、独自のレポート プラグインをカスタマイズまたは作成する場合、PHP についての基本的な知識が必要です。
レポート関連の用語およびレポートプラグインの基本構造をまだよく理解していない場合は、先にそちらを参照してください。
このチュートリアルでは、完全に機能するサンプル カスタム レポート プラグインを作成する方法を詳しく説明します。このレポート プラグインの目的は、設定されたスコープ (マイルストーンやテスト計画/ランなど) でのテスト ケースのタイプおよび優先順位ごとの結果分布を表示するレポートを生成することです。完全なソースコードは GitHub でも入手できます。

TestRail 4.x 用の PHP/CSS/JS コードがある GitHub リポジトリ
TestRail 3.x 用の PHP/CSS/JS コードがある GitHub リポジトリ
注意①:レポート プラグインは、TestRail のバージョンによって多少異なる場合があります (たとえばレポート フォームのマークアップなど)。詳細については、TestRail のバージョンと一致する GitHub リポジトリを参照してください。このチュートリアルは、TestRail バージョン (4.x) を想定しています。
注意②:サンプルの利用には PHP のショートタグを有効にする必要があります。 有効にするには php.ini で short_open_tag=On を設定します。
注意③:カスタムスクリプトについては、作成されたスクリプトに関するエラーの調査や解決をサポートすることはできません。PHPスクリプトの実装経験のある方の支援をお願いしてください。
ディレクトリと初期ファイルの作成
最初に、レポート プラグイン用の新しいディレクトリと初期ファイルを作成します。
レポート プラグインの名前には、レポートの目的や主要なエンティティを含めるのが適切です。命名規則として、エンティティ (たとえば “tests”) を先頭に置き、レポートの内容を表す簡単な説明を追加します (“property_results” など)。
そこで、次のディレクトリ構造を作成します。
tests_property_results/
tests_property_results/about.json
tests_property_results/i18n/
tests_property_results/i18n/translations/
tests_property_results/i18n/translations/en/reports_tpr.php
tests_property_results/report.php
about.json はレポート プラグインの説明ファイルであり、report.php には PHP ベースの実装クラスが含まれていることを思い出してください。i18n ディレクトリには翻訳ファイルが含まれています。
about.json
説明ファイルはシンプルで、ラベル (名前)、説明などのほか、翻訳ファイルを定義するために使用されます。
{
	"author": "Gurock Software",
	"version": 1,
	"label": "l:reports_tpr_meta_label",
	"summary": "l:reports_tpr_meta_summary",
	"description": "l:reports_tpr_meta_description",
	"group": "l:reports_tpr_meta_group",
	"translations": ["reports_tpr"]
}
reports_tpr.php
翻訳ファイルは、説明ファイルで参照されている初期文字列で設定され、TestRail の Reports エリアのサイドバーにレポート プラグインがどのように表示されるかを定義します。
$lang['reports_tpr_meta_label'] = 'Property Results';
$lang['reports_tpr_meta_group'] = 'Samples';
$lang['reports_tpr_meta_summary'] = 'Demonstrates how to develop
    custom report plugins.';
$lang['reports_tpr_meta_description'] = 'Demonstrates how to develop
    custom report plugins and serves as a reference for
    new report plugins.';
他のレポート プラグインとの名前が競合するリスクを最小限に抑えるために、翻訳ファイルの名前はレポート プラグイン名 (tests_property_results → tpr) と関連付けるべきです。
Report.php
report.php には実際のレポートプラグインの実装が含まれており、レポート オプションの表示および検証を行うためのすべてのメソッド、さらに実際のレポートの表示処理が含まれています。一般的な概要は次のようになります (通常は省略される追加のコメント付き)。
class Tests_property_results_report_plugin extends Report_plugin
{
	public function __construct()
	{
		parent::__construct();
	}

	/**
	 * Prepare Form
	 *
	 * Expected to initialize the validation for the report-specific
	 * options on the report form and to register all possible report
	 * parameters.
	 */
	public function prepare_form($context, $validation)
	{
		..
	}

	/**
	 * Validate Form
	 *
	 * Expected to validate and return the report parameters (that
	 * were previously registered with prepare_form). Parameters
	 * should be returned as key/value array.
	 */
	public function validate_form($context, $input, $validation)
	{
		..
	}

	/**
	 * Render Form
	 *
	 * Expected to return a string/array with the HTML snippet(s) for
	 * the report-specific part of the report form. If an array is
	 * returned, the following keys are supported:
	 *
	 * form:        The HTML snippet with the report options that is
	 *              included as part of the form.
	 * before_form: An HTML snippet that is inserted before the form.
	 *              This should not include any visible HTML code but
	 *              is intended to include HTML/JS/CSS that must not
	 *              be part of the form (such as the HTML for dialogs
	 *              which have their ownelement).
	 * after_form:	An HTML snippet that is inserted after the form.
	 *              The same conditions apply as for before_form.
	 *
	 * Returning a simple string is effectively the same as returning
	 * an array with just the 'form' key.
	 */
	public function render_form($context)
	{
		..
	}

	/**
	 * Run
	 *
	 * Expected to generate the static HTML page for the report. Is
	 * passed the previously configured report parameters (custom
	 * options). Is expected to return an array with the following
	 * keys:
	 *
	 * html:        The HTML content as string (should only be used
	 *              for smaller reports or during development).
	 * html_file:   The path of the static HTML file as string. This
	 *              is an alternative and the recommended way to
	 *              return the HTML. This should point to a temporary
	 *              file which is automatically deleted by TestRail
	 *              after 'run' was executed.
	 * resources:   Array of resource files to copy to the output
	 *              directories (optional).
	 */
	public function run($context, $options)
	{
		..
	}
}
TestRail は、レポート プラグイン ディレクトリ名の後ろに “_report_plugin” が付いた名前のクラスを期待します。また、 “Report_plugin” という名前のレポート プラグインの基底クラスから派生する必要があります。
コンテキスト
コンストラクターを除いて、report.php の各メソッドには、レポートプラグインが実行されているコンテキストまたは環境に関する詳細を含む $context パラメーターが渡されます。たとえば、これには現在のプロジェクトおよび関連オプション (カスタム フィールドのスキームなど) が含まれます。
フォーム
TestRail では、すべてのレポート プラグインにフォームが必要です。次のステップでは、非常に基本的な空のフォームを設定します。ここでは、report.php の prepare_form と validate_form は無視して、render_form だけに注目します。
public function render_form($context)
{
	$params = array(
		'project' => $context['project']
	);

	return array(
		'form' => $this->render_view(
			'form',
			$params,
			true
		)
	);
}
render_form は、「フォーム」と呼ばれるビューをレンダリングし、その結果を TestRail に返します。ビューは、静的 HTML ファイルの生成を担当する単純な PHP ファイルです。ビューにはパラメーターを渡すことができ、渡されたパラメーターはビューのランタイム環境で利用できます。ビューはレポートプラグインの “views” サブディレクトリに置く必要があります。今回は form.php は空のままにしておきます。
tests_property_results/views/
tests_property_results/views/form.php
フォームを文字列として直接返すことも、配列の形でより複雑な結果を使用することもできます。ここでは、将来の変更に備えて後者を選択します。
レポートのレンダリング
レポートは “run” によってレンダリングされます。このメソッドは、静的 HTMLをレンダリングしてレポートが参照するリソースのリストと共に返すことが期待されています。report.php の 最小限の実装は次のようになります。
class Tests_property_results_report_plugin extends Report_plugin
{
	// The resources (files) to copy to the output directory when
	// generating a report.
	private static $_resources = array(
		'js/jquery.js',
		'styles/print.css',
		'styles/reset.css',
		'styles/view.css'
	);

	..

	public function run($context, $options)
	{
		$project = $context['project'];

		// Render the report to a temporary file and return the path
		// to TestRail (including additional resources that need to be
		// copied).
		return array(
			'resources' => self::$_resources,
			'html_file' => $this->render_page(
				'index',
				array(
					'report' => $context['report'],
					'project' => $project
				)
			)
		);
	}
}
通常、このメソッドはレポート プラグインの最も複雑なメソッドであり、すべての要素がまとめられる場所です。メソッドは TestRail から前述のコンテキストとレポートのオプションを受け取り、通常、次の処理を行います。
-
レポートのスコープを確認してセット アップします
-
レンダリング対象のデータを計算します
-
データをビューに渡して静的 HTML を返します
今回は、render_form と同様に、最低限のビュー (“index”) をレンダリングし、その結果を TestRail に返します。また、レポート出力ディレクトリにコピーするリソースのリストも返します。ビュー (index.php) は次のようになります。
$min_width = 960;

$header = array(
	'project' => $project,
	'report' => $report,
	'meta' => $report_obj->get_meta(),
	'min_width' => $min_width,
	'css' => array(
		'styles/reset.css' => 'all',
		'styles/view.css' => 'all',
		'styles/print.css' => 'print'
	),
	'js' => array(
		'js/jquery.js'
	)
);

$GI->load->view('report_plugins/layout/header', $header);
?>
The report content goes here.
$temp = array();
$temp['report'] = $report;
$temp['meta'] = $report_obj->get_meta();
$temp['show_options'] = true;
$temp['show_report'] = true;
$GI->load->view('report_plugins/layout/footer', $temp);
$GI は TestRail のスーパーオブジェクトであり、すべてのビューからアクセスできます。これはサブビューをロードするためのメソッドを提供します。これを利用して、レポートのヘッダーおよびフッターに TestRail の標準ビューを表示します。
開発モード
次に、レポート プラグインのテストを開始します。それには、通常、TestRail の [レポート] タブに移動し、レポート プラグインを選択してページ下部の [レポートの追加] ボタンをクリックします。その後、バックグラウンド タスクがレポートを生成してレポートを表示できるようになるまで待ちます。このワークフローは通常の TestRail ユーザーには問題ありませんが、新しいレポート プラグインを開発、テスト、デバッグするときには少し面倒です。幸いなことに、TestRail にはこのプロセスを容易にする、特別なレポート開発モードがあります。
このモードを有効にするには、TestRail の config.php ファイルに次のオプションを追加します。
define('DEPLOY_DEVELOP_REPORT', true);
開発モードを有効にすると、レポート フォームに次のように [レポートの追加と表示] ボタンが表示されます。

このボタンをクリックすると、TestRail は通常のバックグラウンド処理を回避してただちにレポートを生成します。レポートが利用可能になると、レポートを表示する特別なページに自動的にリダイレクトされます。開発モードの最も便利な点は、いつでもこのページを更新して、レポートを再生成できることです。
実行
開発モードを有効にしたら、新しいレポートを追加できます。次のページが表示されます。
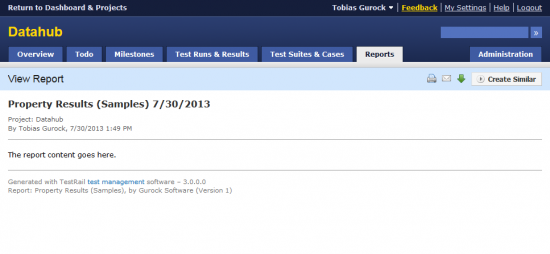
この画面が表示されたら、成功です。
次のステップ
次のパートで、フォームにオプションを追加する方法およびレポートのスコープを設定する方法を学びます。