通常、レポート フォームは 2 つのセクションに分かれています。最初のセクションでは、レポートのいわゆるカスタム オプションを設定します。このセクションは、レポート プラグインごとに異なります。2 番目のセクションはシステム オプション (アクセス、通知、スケジュール) を定義するもので、すべてのレポート プラグインで同じです。このトピックでは、レポート フォームへの入力方法と、これらのオプションを使用してレポートの生成をカスタマイズする方法について説明します。
フォーム オプション
TestRail のビルトイン レポート プラグインは、すべて柔軟にカスタマイズ可能であり、生成されるレポートのスコープ、レイアウト、詳細レベルを設定できます。タブコントロールを使用して、さまざまなオプションを構造化し、グループ化するのはよい考えです。これは通常、新しいレポート フォームを設計する際の最初のステップでもあります。
<div class="tabs">
  <div class="tab-header">
    <a href="javascript:void(0)" class="tab1 current" rel="1"
      onclick="App.Tabs.activate(this)">
        <?= lang('reports_tpr_form_details') ?></a>
    <a href="javascript:void(0)" class="tab2" rel="2"
      onclick="App.Tabs.activate(this)">
        <?= lang('reports_tpr_form_runs') ?></a>
  </div>
  <div class="tab-body tab-frame">
    <div class="tab tab1">
      <!-- The content of tab 1 goes here -->
    </div>
    <div class="tab tab2 hidden">
      <!-- The content of tab 2 goes here -->
    </div>
  </div>
</div>
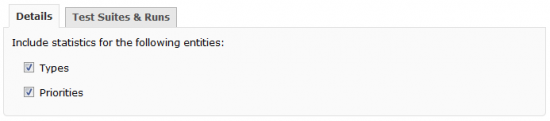
複数の目的を持つレポート プラグインの場合は、通常、詳細レベルをカスタマイズ可能にすることをお勧めします。サンプルのレポート プラグインは、テスト ケースのタイプと優先順位ごとの結果分布を表示するレポートをレンダリングすることになっていることを思い出してください。この場合に役立つオプションは、エンティティの包含/除外です。
それには、report.php のフォームに関連する関数に記述を追加します。まず、prepare_form から始めます。この関数は、フォームを準備してオプションを登録します。
public function prepare_form($context, $validation)
{
  // Assign the validation rules for the fields on the form.
  $validation->add_rules(
    array(
      'custom_types_include' => array(
        'type' => 'bool',
        'default' => false
      ),
      'custom_priorities_include' => array(
        'type' => 'bool',
        'default' => false
      )
    )
  );

  if (request::is_post())
  {
    return;
  }

  // We assign the default values for the form depending on the
  // event. For 'add', we use the default values of this plugin.
  // For 'edit/rerun', we use the previously saved values of
  // the report/report job to initialize the form. Please note
  // that we prefix all fields in the form with 'custom_' and
  // that the storage format omits this prefix (validate_form).

  if ($context['event'] == 'add')
  {
    $defaults = array(
      'types_include' => true,
      'priorities_include' => true
    );
  }
  else
  {
    $defaults = $context['custom_options'];
  }

  foreach ($defaults as $field => $value)
  {
    $validation->set_default('custom_' . $field, $value);
  }
}
関数は次の 2 つの処理を行います。最初のステップは、渡された $validation オブジェクトを使用してオプションの検証ルールを設定することです。次に、これらのオプションのデフォルト値を設定します。$context パラメーターを使用して、新しいレポートを追加するのか既存のレポートを編集/再実行するのかを決定する方法と、決定によってデフォルト値の処理が異なる点に注意してください。
次に validate_form に記述を追加してオプションの検証/返却を行います。
public function validate_form($context, $input, $validation)
{
  // At least one detail entity option must be selected (types or
  // priorities).
  if (!$input['custom_types_include'] &&
    !$input['custom_priorities_include'])
  {
    $validation->add_error(
      lang('reports_tpr_form_details_include_required')
    );

    return false;
  }

  $values = array();

  static $fields = array(
    'types_include',
    'priorities_include'
  );

  foreach ($fields as $field)
  {
    $key = 'custom_' . $field;
    $values[$field] = arr::get($input, $key);
  }

  return $values;
}
単純な検証シナリオは prepare_form で設定された検証ルールですでにカバーされているので、validate_form では、より複雑なシナリオを処理できます。たとえば、フォーム上で少なくとも 1 つのエンティティ (タイプまたは優先順位) が選択されていることを確認します。レポートオプションは後のレンダリング ステップで使用するので、メソッドからオプションを返します。
続いて form.php のフォームに対応するコードを追加します。
..
<!-- The content of tab 1 goes here -->
<p class="top"><?= lang('reports_tpr_form_details_include') ?></p>
<div class="checkbox form-checkbox" style="margin-left: 15px">
  <label>
    <?= lang('reports_tpr_form_details_include_types') ?>
    <input type="checkbox" id="custom_types_include"
      name="custom_types_include" value="1"
      <?= validation::get_checked('custom_types_include',1) ?> />
  </label>
</div>
<div class="checkbox" style="margin-left: 15px">
  <label>
    <?= lang('reports_tpr_form_details_include_priorities') ?>
    <input type="checkbox" id="custom_priorities_include"
      name="custom_priorities_include" value="1"
      <?= validation::get_checked('custom_priorities_include',1) ?> />
  </label>
</div>
..
フォーム コントロール
カスタム オプションを使用して複雑なフォームを作成することも可能ですが、多くのレポート プラグインは同じオプションを共有しているため、これらのオプションを何度も実装するのは合理的ではありません。幸いなことに、TestRail のレポートエンジンは「フォーム コントロール」と呼ばれる機能を持っています。これはよく利用されるオプションを実装しており、ビルトインのレポート プラグインやカスタム レポート プラグインから再利用できます。ステータス、ユーザー、テスト スイート、テスト ランなどのセットを選択するためのコントロールがあります。
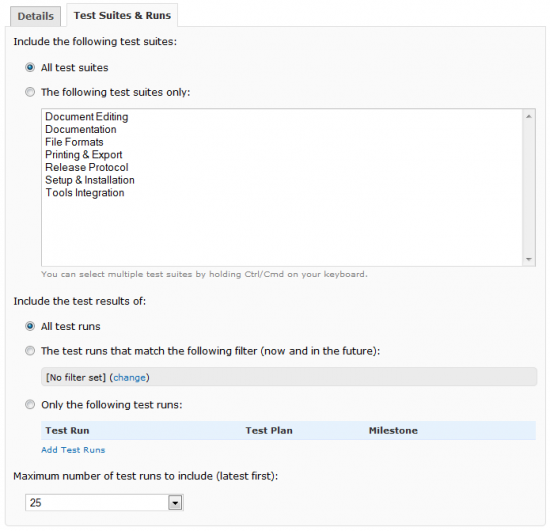
このセクションでは、フォーム コントロールを使用してレポート プラグインの「スコープ」を設定する方法について説明します。今回の例では、生成されるレポートに含めるテスト ランをスコープとするため、実行選択および実行制限フォーム コントロールを使用します。report.php で次のコードを追加/変更します。
class Tests_property_results_report_plugin extends Report_plugin
{
  private $_controls;

  // The controls and options for those controls that are used on
  // the form of this report.
  private static $_control_schema = array(
    'runs_select' => array(
      'namespace' => 'custom_runs',
      'multiple_suites' => true
    ),
    'runs_limit' => array(
      'type' => 'limits_select',
      'namespace' => 'custom_runs',
      'min' => 0,
      'max' => 100,
      'default' => 25
    )
  );

  ..

  public function __construct()
  {
    parent::__construct();
    $this->_controls = $this->create_controls(
      self::$_control_schema
    );
  }

  public function prepare_form($context, $validation)
  {
    // Assign the validation rules for the controls used on the
    // form.
    $this->prepare_controls($this->_controls, $context,
      $validation);

    ..
  }

  public function validate_form($context, $input, $validation)
  {
    ..

    // We begin with validating the controls used on the form.
    $values = $this->validate_controls(
      $this->_controls,
      $context,
      $input,
      $validation);

    if (!$values)
    {
      return false;
    }

    ..
  }

  public function render_form($context)
  {
    $params = array(
      'controls' => $this->_controls,
      'project' => $context['project']
    );

    ..
  }
}
基本的に、定義されたスキーマに基づいてコンストラクター内でコントロールを作成し、prepare_form にコントロールを登録して validate_form で検証します。また、必ずコントロールをフォーム ビューに渡します。あとは、対応するフロントエンド コードを form.php に埋め込むだけです
//The content of tab 2 goes here
$report_obj->render_control(
  $controls,
  'runs_select',
  array(
    'top' => true,
    'project' => $project
  )
)

$report_obj->render_control(
  $controls,
  'runs_limit',
  array(
    'intro' => lang('report_plugins_runs_limit'),
    'limits' => array(5, 10, 25, 50, 100, 0)
  )
)
その後、レポート フォームの [テスト スイートとテスト ラン] タブに切り替えると、次のように表示されます。
report.php のフォーム メソッドにコントロール サポートを追加したことで、選択されたコントロール値が自動的にレポート オプションに保存され、レポートをレンダリングするときに標準の $options パラメータを通じて利用できるようになることに注目してください。これについては次のセクションで説明します。
レポート ヘルパー
フォーム コントロールと同様に、TestRail のレポート エンジンは、データベースから実際のデータを読み取るための一般的なデータベース関連クエリーへのアクセスも提供します。これらのクエリーは、「レポート ヘルパー」に含まれるオブジェクト メソッドを介して利用可能になります。このヘルパーは report.php では $this→_helper 、レポート ビューでは $report_helper によってアクセスできます。
このヘルパーの多くの機能は、フォーム コントロールと組み合わせて使用されるように設計されています。詳細は以下の例で説明します。レポートの実際の表示処理 (report.php の run メソッド) に移動して、レポートの範囲を設定します。
public function run($context, $options)
{
  $project = $context['project'];

  // Read the test suites first.
  $suites = $this->_helper->get_suites_by_include(
    $project->id,
    $options['runs_suites_ids'],
    $options['runs_suites_include']
  );

  $suite_ids = obj::get_ids($suites);

  // We then get the actual list of test runs used, depending on
  // the report options.
  if ($suite_ids)
  {
    $runs = $this->_helper->get_runs_by_include(
      $project->id,
      $suite_ids,
      $options['runs_include'],
      $options['runs_ids'],
      $options['runs_filters'],
      null, // Active and completed
      $options['runs_limit'],
      $run_rels,
      $run_count
    );
  }
  else
  {
    $runs = array();
    $run_rels = array();
    $run_count = 0;
  }

  $run_ids = obj::get_ids($runs);

  ..
}
フォーム コントロールのオプション ($options パラメーターに含まれています) を使用して、データベースから該当するテスト スイートおよび実行を読み取り、レポートします。レポート ヘルパーは多くの追加の メソッド を提供します。全体の概要を理解するには、<TestRail>/app/plugins/reports にあるビルトイン レポート プラグインのソース コードを参照することをお勧めします。
次のステップ
最後のパートで、データベースに直接アクセスしてカスタム クエリーを実行する方法と、データをレンダリングする方法を学びます。