This topic explains how to integrate TestRail with Pivotal Tracker. There are currently three ways to integrate TestRail with Pivotal Tracker, namely:
-
- Using defect URLs to link test results to Pivotal Tracker
- Using reference URLs to link test cases to Pivotal Tracker
- Using the defect plugin for Pivotal Tracker to push and look up Pivotal Tracker issues in the Defects field of test results
- Using the reference plugin for Pivotal Tracker to look up Pivotal Tracker issues in the References field of TestRail entities such as test cases, test runs, and milestones
You don’t have to use all listed integration options, and you can mix and match the integration with other tools. Configuring the integration usually only takes a few minutes. This guide explains how to configure the integration and how it works.
Defect URLs
The defect URLs are used to let TestRail know how to convert a Defect ID into a URL for your Pivotal Tracker instance. There are two types of URLs: View URLs and Add URLs.
The Defect View URL is used to build a link to Pivotal Tracker based on the Defect ID, so you can simply click on an ID to open the issue directly in Pivotal Tracker.
The Defect Add URL is used to create a link to the issue creation screen inside Pivotal Tracker. Once the URL is configured, a new Add link appears next to the Defects field in the Add Test Result dialog and the ‘Defects’ menu in TestRail’s Push Defect From Anywhere feature. This link allows you to jump to Pivotal Tracker’s New Issue form to report a new bug.
If you see the ‘Add’ link, you can copy the ID of your new Pivotal Tracker issue and enter it into any Defects or References field inside TestRail.
To configure Pivotal Tracker’s URLs in TestRail, select Administration > Integration. You can alternatively enter separate bug tracker URLs for each project under Administration > Projects. Use the following example URLs to configure the addresses:
Pivotal Tracker
Defect View Url: https://www.pivotaltracker.com/story/show/%id%
Defect Add Url: Can be any Pivotal Tracker URL
Reference URLs
The reference URLs are implemented in a very similar manner to Defect URLs described above. The primary difference is Reference URLs are used for the ‘References’ field on various TestRail entities (instead of the Defects field).
The Reference View URL is configured in the same manner as described above and allows TestRail to create a direct link to a Pivotal Tracker based on an ID entered into a References field.
The Reference Add URL is also configured in the same way as the Defect Add URL. Once configured, an ‘Add’ link will appear next to each References field in your instance or project. If you use the ‘Add’ link, you can copy the ID of your new Pivotal Tracker issue and enter it into any Defects or References field inside TestRail.
If you have the Reference plugin configured, you’ll also be able to hover over a Reference ID to view the issue details directly from within TestRail. Keep reading to learn how to use and configure the Defect and Reference Plugins.
Defect Plugin
Defect plugins can be used to implement a deeper bug tracker integration and TestRail comes with a ready-to-use Pivotal Tracker defect plugin. To configure the defect plugin, select Administration > Integration and select Pivotal Tracker in the Defect Plugin dropdown list. The next step is to configure all the necessary connection settings in the Configuration field. Project-specific plugins and configuration settings can optionally be specified under Administration > Projects.
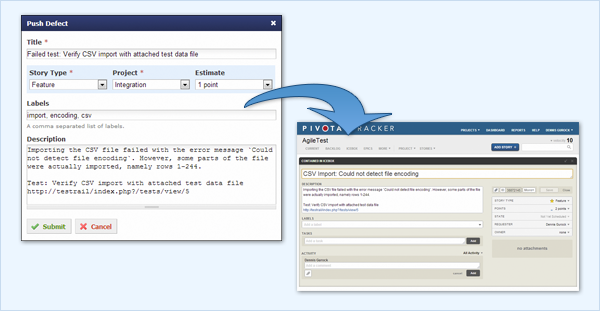
When the defect plugin has been configured, a new Push link is shown next to the Defects field in the Add Test Result dialog. Clicking the link will open a popup dialog that enables you to push a bug report to Pivotal Tracker without leaving TestRail.
Once the test result is added, hovering the mouse cursor over a defect ID will open a window with useful information and status details about the story in Pivotal Tracker.
Customizations
The Pivotal Tracker defect plugin was built to work with a standard Pivotal Tracker configuration. TestRail allows you to customize the fields which appear in the Push dialog as well as when hovering over Defect IDs. Preconfigured push fields and hover fields can be set to ‘on’ or ‘off’ in their respective [push.fields] and [hover.fields] sections, or change the order in which they appear by the fields in each section.
Please keep in mind some fields (such as the title field) are always enabled and may not appear in these sections due to always beings required by either TestRail or Pivotal Tracker.
The Pivotal Tracker Defect Plugin also supports modifying field properties.
In addition to enabling, disabling, or re-organizing fields as described above, it’s also possible to change additional options per field. To do this, you would define a section for the field, such as [push.field.description], and specify additional options within this section.
[push.field.description]
label=Detailed Description
required=true
Please see below for a full list and explanation of the available field options:
| Option | Description |
|---|---|
| label | Specifies the display name of the field in the Push Defect dialogue |
| remember | Specifies if previously selected values for this field should be remembered and restored the next time the Push Defect dialogue is opened |
| required | Specifies if this field is mandatory or optional and whether users are required to enter a value for this field in the Push Defect dialogue |
| size | Specifies whether the field is displayed as a compact field (compact) or uses the full width of the dialogue (full) |
Attachments
The Pivotal Tracker Defect Plugin supports submitting attachments to Pivotal Tracker as well. This field can be turned on and off, but cannot be customized. To submit one or more attachments to Pivotal Tracker, simply drag the attachment to the attachments or description areas of the push dialog or click on the area to choose an attachment from your file system.
Reference Plugin
Reference plugins can be used to retrieve additional information from IDs entered into the References field of TestRail entities, such as test cases, test runs, and milestones. The Reference Plugin is configured on the References tab of the integration settings, in the same manner, the Defect Plugin is configured.
The plugin supports hovering over Reference IDs but does not support a Push dialog for the References field. It is also possible to customize the fields which appear via link hovering, as described above.
If you have the Defect Plugin already configured for Pivotal Tracker, you can simply copy your [connection] and [hover.fields] sections from the Defect Plugin into the Reference plugin configuration. Alternatively, you can choose different fields to be displayed for References and Defects.
Additional Customizations
TestRail also supports custom defect plugins. If your team uses TestRail Server, it is possible to further customize the defect plugin (or build your own) to support additional field types or other data. Please see our Defect plugins documentation for additional information.