Playwright は、モダン Web アプリケーション用の信頼性の高いエンドツーエンド テスト フレームワークです。Playwright を使用すると、テストの作成とデバッグに役立つ強力なツールを利用して、複数のブラウザーで動作するレジリエントなテスト スクリプトを開発できます。
このチュートリアルでは、TestRail CLI を使用して、Playwright の自動テスト実行で生成されたテスト結果を TestRail に統合する方法を説明します。統合によって、自動テストの結果を中央で管理し、TestRail が提供するすべての解析およびレポート機能を活用できます。
概要
このチュートリアルでは、サンプル プロジェクトを使用して、TestRail CLI と互換性がある Playwright の自動テスト プロジェクトをセットアップし、生成されたテスト結果をアップロードする手順を案内します。
このチュートリアルを通して読むと、以下のことができるようになります。
-
- 簡単な Playwright プロジェクトからテストを実行する
- TestRail CLI をインストールする
- TestRail インスタンスを設定する
- CLI を実行する
- TestRail でテスト ケースとテスト結果を確認する
前提条件
Playwright テスト プロジェクトを実行するには、npm を使用して、または Playwright installation documentation で説明されているその他の方法で Playwright をインストールします。ここでは npm を使用してインストールします。npm を使用して Playwright をインストールするのに必要なのは、Node.js をインストールすることだけです。
また、TestRail への結果のインポートに使用する TestRail CLI をインストールし、実行するには、Python も必要です。
| 前提条件 | 説明 |
|---|---|
| Node.js | OS に合ったバージョンをダウンロードし、インストール ウィザードの指示に従います。 正常にインストールされたことを確認するには、コマンド ラインから次のコマンドを実行します。 node --version および npm --version すると、インストールされたバージョンが出力されます。 |
| Python 3.10.4 | OS に合ったバージョンをダウンロードし、インストール ウィザードの指示に従います。正常にインストールされたことを確認するには、コマンド ラインから python --version および pip --version コマンドを実行します。すると、バージョンが出力されます。 |
サンプル プロジェクトのインストール
まず、サンプル プロジェクトのコードを取得し、必要な依存ライブラリをインストールします。
-
- サンプル プロジェクトをクローンまたはダウンロードします。
- プロジェクトのルート フォルダーでコマンド プロンプトを開いて次のコマンドを実行します。
$ npm install
packages.json ファイルには、このプロジェクトのためにインストールするライブラリが含まれています。この場合、唯一の依存関係は Playwright 自体だけです。当然、Playwright は他のライブラリに依存しています。
| 要件 | 説明 |
|---|---|
| @playwright/test | Web 自動化機能を持つテスト自動化フレームワーク |
サンプル プロジェクトの確認
任意の IDE を使用してサンプル プロジェクトを開き、テスト ファイルを確認します。このチュートリアルでは、実行結果のインポート方法に集中できるよう、自動テストのコードはシンプルにしてあります。テストは、Playwright チームがホストする TO DO リスト Web アプリの簡単な操作で構成されています。
// @ts-check
const { test, expect } = require('@playwright/test');
const { randomUUID } = require('crypto');

test.beforeEach(async ({ page }) => {
  await page.goto('https://demo.playwright.dev/todomvc');
});

test.afterEach(async ({ page }, testInfo) => {
  if (testInfo.status !== testInfo.expectedStatus) {
    let screenshotPath = `test-results/screenshots/screenshot-${randomUUID()}.png`;
    await page.screenshot({ path: screenshotPath, fullPage: true });
    testInfo.annotations.push({ type: 'testrail_attachment', description: screenshotPath });
  }
});

const TODO_ITEMS = [
  'buy some cheese',
  'feed the cat',
  'book a doctors appointment'
];

test.describe('New Todo', () => {
  test('should allow me to add todo items', async ({ page }) => {
    // Create 1st todo.
    await page.locator('.new-todo').fill(TODO_ITEMS[0]);
    await page.locator('.new-todo').press('Enter');

    // Make sure the list only has one todo item.
    await expect(page.locator('.view label')).toHaveText([
      TODO_ITEMS[0]
    ]);

    // Create 2nd todo.
    await page.locator('.new-todo').fill(TODO_ITEMS[1]);
    await page.locator('.new-todo').press('Enter');

    // Make sure the list now has two todo items.
    await expect(page.locator('.view label')).toHaveText([
      TODO_ITEMS[0],
      TODO_ITEMS[1]
    ]);

    await checkNumberOfTodosInLocalStorage(page, 2);
  });
});
レポートへの画面ショットの添付
失敗したテストの画面ショットを簡単にキャプチャし、TestRail に送信するには、カスタム JUnit レポーター プロパティを利用します。それには、下のコードのように、Playwright 設定ファイルに testRailOptions を追加するだけです。
// @ts-check
const { devices } = require('@playwright/test');

/**
 * Read environment variables from file.
 * https://github.com/motdotla/dotenv
 */

const testRailOptions = {
  // Whether to add <properties> with all annotations; default is false
  embedAnnotationsAsProperties: true,
  // Where to put the report.
  outputFile: './test-results/junit-report.xml'
};

/**
 * @see https://playwright.dev/docs/test-configuration
 * @type {import('@playwright/test').PlaywrightTestConfig}
 */
const config = {
  /* (...) */

  /* Reporter to use. See https://playwright.dev/docs/test-reporters */
  reporter: [
    ['list'],
    ['html', { outputFolder: 'test-results', open: 'never' }],
    ['junit', testRailOptions]
  ],

  /* (...) */
};

module.exports = config;
JUnit レポーターを適切に設定したら、テスト 結果が期待どおりではない場合に画面ショットをキャプチャするロジックを追加し、画面ショットへのパスを testrail_attachment プロパティに追加するだけです。これを実現するには、上のコード スニペットにすでに含まれている次のコードを使用します。
test.afterEach(async ({ page }, testInfo) => {
  if (testInfo.status !== testInfo.expectedStatus) {
    let screenshotPath = `test-results/screenshots/screenshot-${randomUUID()}.png`;
    await page.screenshot({ path: screenshotPath, fullPage: true });
    testInfo.annotations.push({ type: 'testrail_attachment', description: screenshotPath });
  }
});
サンプル プロジェクトの実行
同じコマンド プロンプトで次のコマンドを実行し、プロジェクトで Playwright のテストを実行して結果を JUnit XML 形式で保存します。
$ npx playwright test
Playwright コマンドの呼び出しが正常に実行されると、test-results フォルダーにテスト結果があるのが確認できます。playwright プロジェクトは 2 つのレポート ファイルを生成するよう設定されています。index.html ファイルを開くと下の図のようにインタラクティブな Playwright HTML レポートを参照できます。
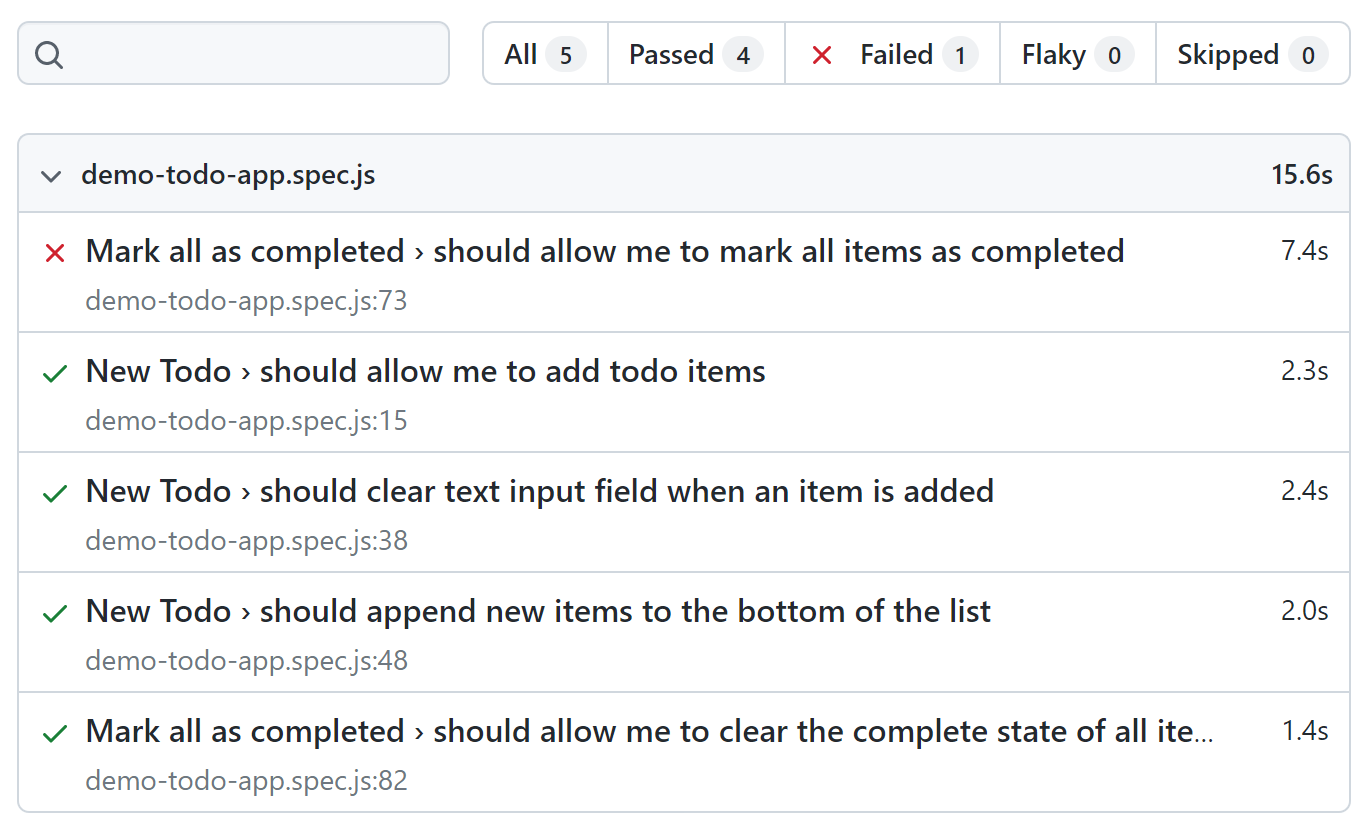
ロボット コマンド オプションで指定したとおり、JUnit XML フォーマットのテスト結果を含む junit-report.xml というファイルもあるはずです。次のステップでは、このファイルを TestRail CLI で解析し、テスト ランを作成してテスト結果を TestRail へアップロードします。
<testsuites id="" name="" tests="5" failures="1" skipped="0" errors="0" time="11.882232000008225">
  <testsuite name="demo-todo-app.spec.js" timestamp="1664397866418" hostname="" tests="5" failures="1" skipped="0" time="15.464" errors="0">
    <testcase name="New Todo should allow me to add todo items" classname="demo-todo-app.spec.js › New Todo › should allow me to add todo items" time="2.369">
    </testcase>
    <testcase name="New Todo should clear text input field when an item is added" classname="demo-todo-app.spec.js › New Todo › should clear text input field when an item is added" time="1.906">
    </testcase>
    <testcase name="New Todo should append new items to the bottom of the list" classname="demo-todo-app.spec.js › New Todo › should append new items to the bottom of the list" time="2.634">
    </testcase>
    <testcase name="Mark all as completed should allow me to mark all items as completed" classname="demo-todo-app.spec.js › Mark all as completed › should allow me to mark all items as completed" time="7.32">
      <properties>
        <property name="testrail_attachment" value="test-results/screenshots/screenshot-f6f2df78-0eaa-487c-a7a3-97ec6bb66a9a.png">
        </property>
      </properties>
      <failure message="demo-todo-app.spec.js:73:3 should allow me to mark all items as completed" type="FAILURE">
        <![CDATA[  demo-todo-app.spec.js:73:3 › Mark all as completed › should allow me to mark all items as completed

    Error: expect(received).toHaveClass(expected) // deep equality

    - Expected  - 3
    + Received  + 3

      Array [
    -   "complete",
    -   "complete",
    -   "complete",
    +   "completed",
    +   "completed",
    +   "completed",
      ]
    Call log:
      - expect.toHaveClass with timeout 5000ms
      - waiting for selector ".todo-list li"
      -   selector resolved to 3 elements

      76 |
      77 |     // Ensure all todos have 'completed' class.
    > 78 |     await expect(page.locator('.todo-list li')).toHaveClass(['complete', 'complete', 'complete']);
         |                                                 ^
      79 |     await checkNumberOfCompletedTodosInLocalStorage(page, 3);
      80 |   });
      81 |

        at C:\Github\d-rede\playwright-tests-new\tests\demo-todo-app.spec.js:78:49
]]>
      </failure>
    </testcase>
    <testcase name="Mark all as completed should allow me to clear the complete state of all items" classname="demo-todo-app.spec.js › Mark all as completed › should allow me to clear the complete state of all items" time="1.235">
    </testcase>
  </testsuite>
</testsuites>
TestRail への結果のインポート
テストを実行し、JUnit 形式のレポート ファイルを生成したら、簡単にテスト結果 (およびテスト ケース) を TestRail にインポートできます。そうすると、自動テストの実行を可視化し、実際にどのようにアプリケーションがテストされているかに関する概要をすべて TestRail 内で参照できます。
TestRail CLI のインストール
すでにマシンに Python がインストールされている場合、TestRail CLI をインストールするには、コマンド ラインで次のコマンドを実行するだけです。
$ pip install trcli
TestRail の設定
次に、下の手順に従って TestRail インスタンスを設定する必要があります。
-
- [管理] > [サイト設定] に移動して [API] タブをクリックし、[API の有効化] オプションをオンにして TestRail API を有効化します。
- 自動テスト ケースのコードと実際の TestRail のケースをマッピングするためのカスタム フィールドを作成します。それには、[管理] > [カスタマイズ] に移動して [フィールドの追加] をクリックします。フィールド作成画面に移動したら、下記の 2 つの要件に従ってフィールドを作成します。
- システム名は automation_id
- タイプは Text
TestRail への結果の送信
TestRail CLI をインストールし、TestRail インスタンスの設定が完了したら、次のような 1 行のコマンドを実行してテスト結果をアップロードできます。
$ trcli -y \
>  -h https://INSERT-INSTANCE-NAME.testrail.io \
>  --project "My Project" \
>  --username INSERT-EMAIL \
>  --password INSERT-PASSWORD \
>  parse_junit \
>  --title "Playwright Automated Test Run" \
>  -f "./test-results/junit-report.xml"
デフォルトの場所を変更した場合、-f オプションの後のファイル名がレポート ファイルへのパスに一致している必要があります。その他のオプションはすべて TestRail インスタンスおよびプロジェクトに合わせます。他のコマンド ライン オプションについては、プロジェクト リポジトリの TestRail CLI README.md ファイル、TRCLI のマニュアル ページを参照するか、下記のコマンドを実行して CLI の組み込みヘルプを参照します。
$ trcli --help
$ trcli parse_junit --help
TestRail での結果の可視化
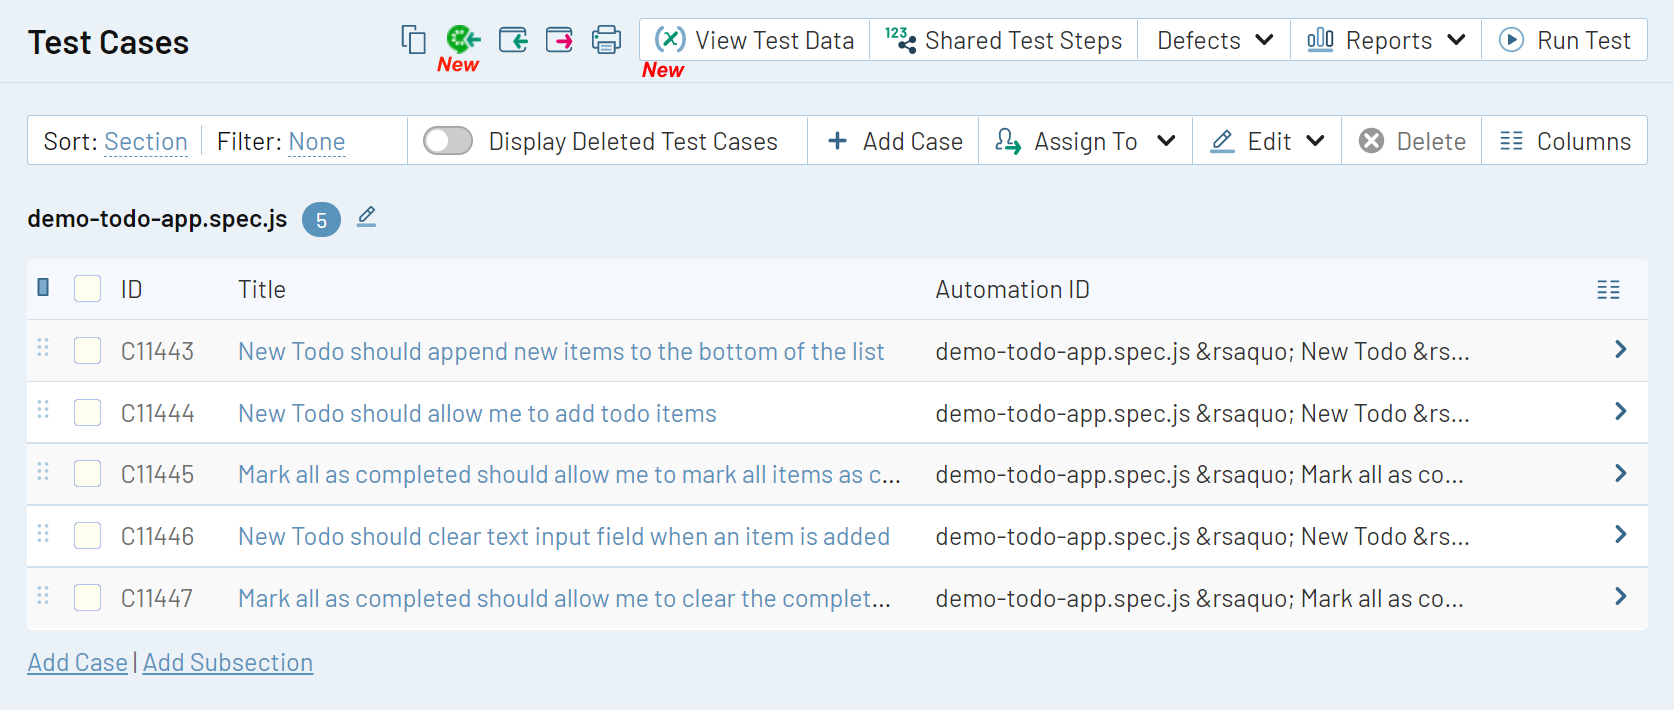
TestRail プロジェクトのテスト ケース ページに移動すると、テスト結果レポートに含まれていたテストに対応するテストケースが TestRail によって自動的に作成されていることがわかるでしょう。JUnit レポートのテストごとに classname および name 属性を組み合わせて一意の Automation ID を追加していることに注目してください。この Automation ID を使用して自動化コードのテストと TestRail のテスト ケースをマッピングします。つまり、TestRail CLI を実行するたびに、TestRail の既存のテスト ケースと比較し、該当する Automation ID を持つテスト ケースがない場合にだけ新しいテスト ケースを作成します。
※テストの名前、ファイル名、またはファイルの場所を変更した場合、対応するテストの Automation ID は TestRail の既存のテスト ケースにマッピングされません。
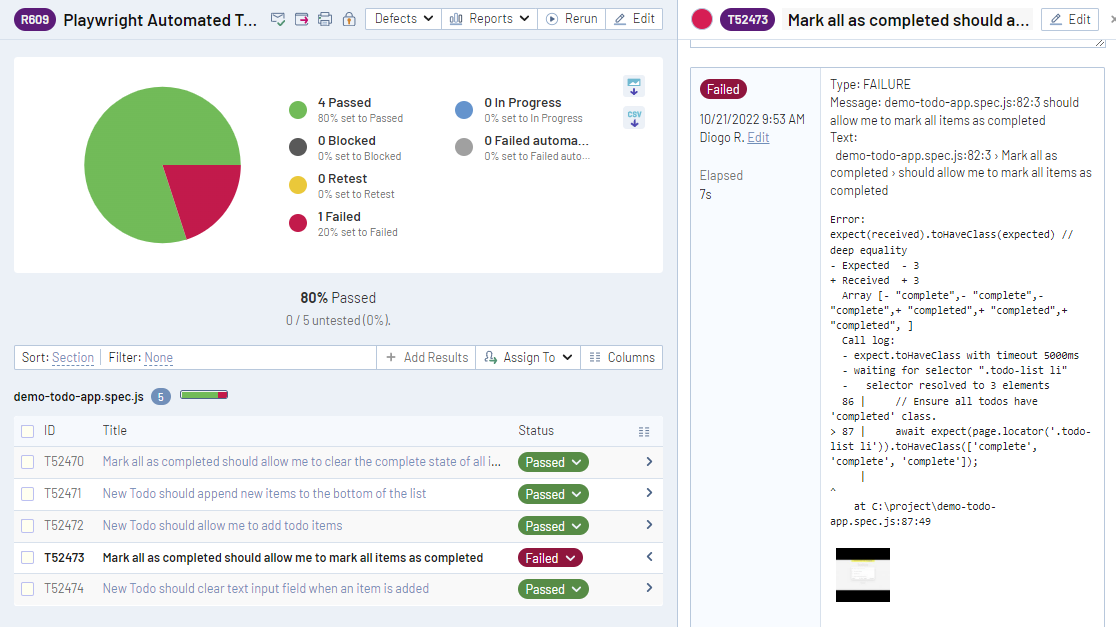
[テスト ランと結果] ページでは、Playwright Automated Test Run という名前のテスト ランが作成されたのを確認できます。テスト ランを開き、各自動テスト結果の詳細をドリルダウンします。下の図に示すように、テストが失敗したときには、画面ショットなどの添付ファイルとともにテスト自動化フレームワークが出力したエラー メッセージもテスト結果に登録されているため、テストが失敗した理由の高度な解析が可能です。
次のステップ
テスト結果が TestRail に集約されたので、失敗したテストのエラー メッセージも含めて自動テスト実行の結果を確認できるだけでなく、手動テストと自動テストをレポート上で集約し、アプリケーションに関する完全なテスト カバレッジを表示したり、テスト自動化プロセスを追跡したりすることも可能です。また、手動テストの結果だけでなく、自動テストの結果から任意の課題トラッカーに直接バグをレポートすることもできます。
TestRail のレポート機能を活用する方法については、TestRail のレポートおよびテスト メトリクスの動画を参照してください。