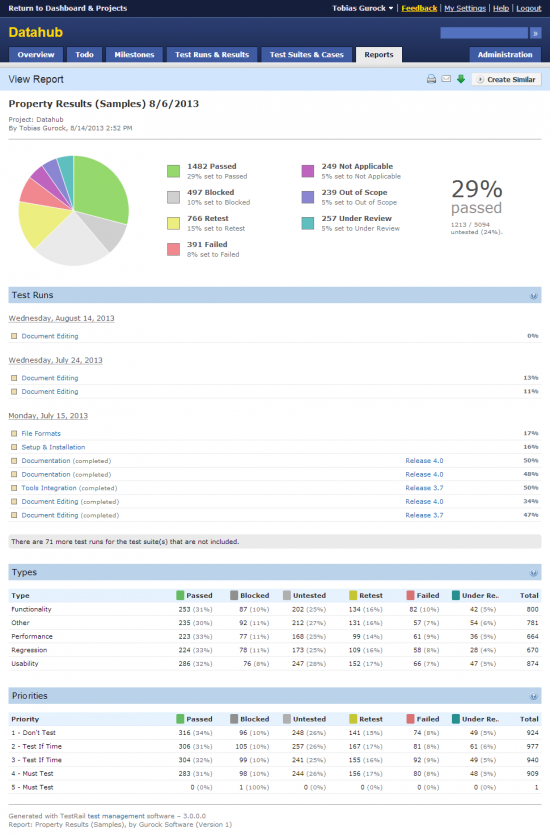
カスタム レポート プラグインの作成の前のパートで紹介したレポート ヘルパーに加えて、データベースへの直接アクセスもサポートされています。この最後のパートでは、独自のデータベース モデルを作成するところから、データベースへのアクセス、データをビューに渡してレンダリングするまでのすべてについて説明します。
このページで説明しているデータベース アクセス メソッドを使用して書き込みクエリーを実行し、TestRail のデータベースを変更することは、技術的には可能ですが、サポートされていません。読み取りクエリーのためにデータベースにアクセスすることだけが許可されています。
データベース アクセス
通常、データベース コードと実際のレポート ロジックを分離するために、レポート プラグインのカスタム データベース クエリーはモデルにバンドルされます。サンプル レポート プラグインでもこの原則に従い、report.php のコードと必要な変更を確認します。
class Tests_property_results_report_plugin extends Report_plugin
{
  private $_model;

  ..

  public function __construct()
  {
    parent::__construct();
    $this->_model = new Tests_property_results_summary_model();
    $this->_model->init();
    $this->_controls = $this->create_controls(
      self::$_control_schema
    );
  }

  ..
}

class Tests_property_results_summary_model extends BaseModel
{
  ..
}
モデルは、基本モデル (BaseModel) から派生する独立したクラスです。このクラスのインスタンスは、レポート プラグインのコンストラクターで作成され、$this→_helper によってアクセスできます。モデルに最初のメソッドを追加することができます。
class Tests_property_results_summary_model extends BaseModel
{
  public function get_statuses()
  {
    $this->db->select('*');
    $this->db->from('statuses');
    $this->db->where('is_active', true);
    $this->db->order_by('display_order');
    return $this->db->get_result();
  }

  public function get_types()
  {
    $this->db->select('*');
    $this->db->from('case_types');
    $this->db->where('is_deleted', false);
    $this->db->order_by('name', 'asc');
    return $this->db->get_result();
  }

  public function get_type_results($run_ids, $type_id)
  {
    $query = $this->db->query(
      'SELECT
        tests.status_id,
        COUNT(*) as status_count
      FROM
        tests
      JOIN
        cases
          on
        cases.id = tests.content_id
      WHERE
        tests.run_id in ({0}) and
        cases.type_id = {1}
      GROUP BY
        tests.status_id',
      $run_ids,
      $type_id
    );

    $results = $query->result();
    return obj::get_lookup_scalar(
      $results,
      'status_id',
      'status_count'
    );
  }

  /* Skipped for priorities */

  ..
}
ここで説明するべきポイントがいくつかあります。モデルは $this→_db オブジェクトを介してデータベースにアクセスし、(get_type_results のように) 直接クエリーを発行するか、(get_statuses のように) 軽量のラッパーを使用します。ラッパーはすべての SQL コマンドをサポートしているわけではないので、単純な select、from、where、get sequence 以外の複雑なクエリーには直接クエリーを使用することをお勧めします。どちらの場合も、必要に応じて SQL パラメータが自動的に引用、変換、およびエスケープされることに注意してください。
レポート プラグイン クラスに戻り、次のように新しいモデル メソッドを利用できます。
public function run($context, $options)
{
  ..

  // Get all active statuses from the database.
  $statuses = $this->_model->get_statuses();
  $status_ids = obj::get_ids($statuses);

  // Read the case types and priorities from the database.
  $types_include = $options['types_include'];
  $types = array();
  $types_results = array();

  if ($types_include && $run_ids)
  {
    $types = $this->_model->get_types();
    foreach ($types as $type)
    {
      $types_results[$type->id] =
        $this->_model->get_type_results(
          $run_ids,
          $type->id
        );
    }
  }

  /* Skipped for priorities *

  ..

}
データのレンダリング
実際のデータはビューによって静的な HTML ページにレンダリングされることを思い出してください 。まだ完成していないのは、データをビューに渡して適切にレンダリングする部分です。カスタム レポート プラグインの作成のパート 1 ですでに標準の「インデックス」ビューを設定してあるので、render_page の呼び出しを次のように変更してデータを渡すことができます。
..

return array(
  'resources' => self::$_resources,
  'html_file' => $this->render_page(
    'index',
    array(
      'report' => $context['report'],
      'project' => $project,
      'runs' => $runs,
      'run_rels' => $run_rels,
      'statuses' => $statuses,
      'types_include' => $types_include,
      'types' => $types,
      'types_results' => $types_results,
      'priorities_include' => $priorities_include,
      'priorities' => $priorities,
      'priorities_results' => $priorities_results
    )
  )
);

..
ビューのソース コード全体は、ここには掲載されていません。これについては TestRail カスタマイズ GitHub リポジトリ を参照してください。処理を追うのは簡単です。単にレポート オプションと渡されたデータに基づいて HTML を生成しているだけです。
まとめると、レポート フォームは次のようになります。

